Sunday 25 September 2016

AmeriCymru Birthday Cake - September 2016


Made in America with its roots in Wales, UK

This cake was going to be different for so many reasons, that it was probably going to be one of my biggest challenges to date because:
  1. The delicate decorations had to make a monumental journey
  2. Then make it through customs, declared, of course
  3. I was nowhere near my kitchen
  4. I was without any of my tools
  5. People don't weigh things here, it's all "cups"  so there was no weighing scales
  6. I was going to have to half "fake it" and use a packet mix for speed
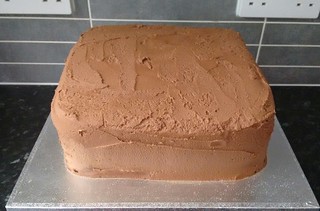
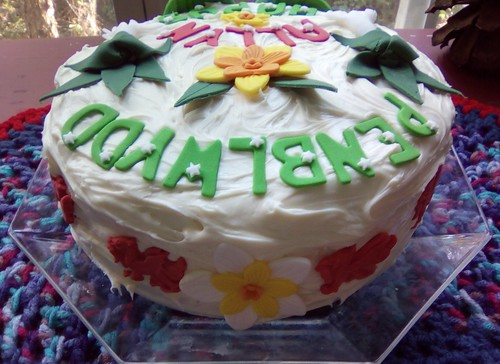
  7. The recipient doesn't like fondant on cakes, so it had to be frosting


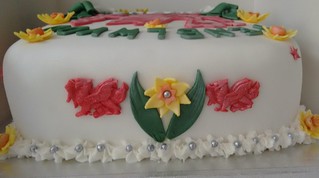
So this cake started about a two weeks ago and 4000 miles away, with all the fondant decorations, the leeks, the dafodills, the names and messages, all had to be made and given extra time harden up so they could be packed. Task completed most successfully. I had one casualty and, due to the fact I made way more than I would need, it wouldn't matter.


I faked the ingredients, went to the nearest supermarket on the day and purchased a funfetti mix. I also purchased standard size sponge tins, ready made frosting for the sandwiching and covering and some basic essential tools.
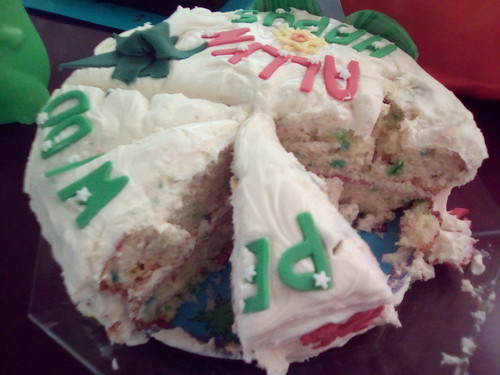
Funfetti inside

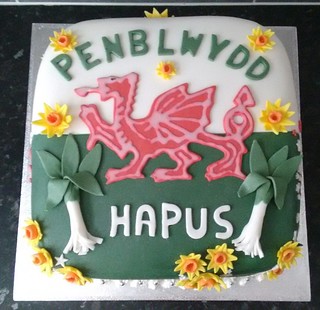
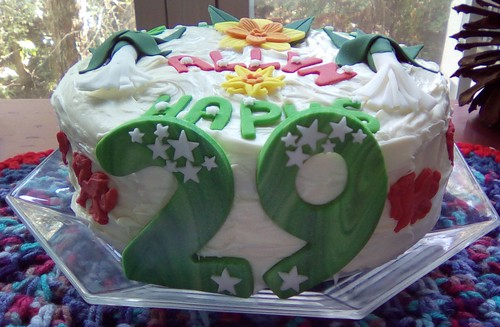
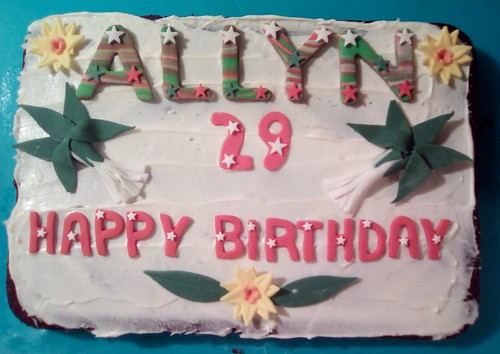
Just in case you hadn't guessed it by the name, it's a cake made for my son's birthday, who lives is America.  Covered in all things Welsh and Wales related: leeks, dragons, dafodills and lots of hugs from mam.

It turned out amazing if I'm honest. Topped in frosting rather than fondant and enjoyed by everyone who ate a piece.

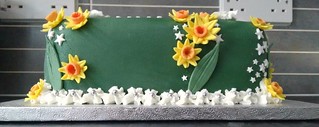
As I had made so many decorations, for a number of reasons, I had loads left. So, with that in mind, I'm going to spare a moment to showcase a brownie tray cake, made by my daugher-in-law and decorated with the spare decorations I had made. The brownies are half "faked" too, but wow, they are gooey and delicious.


I'd like to thank everyone, home and away, that made this birthday a special one. Thanks guys xxx

And happy birthday son <3 x

Sunday 11 September 2016

Product review - Trex


What is it?

Trex is a vegitable fat, sold in the UK, that can be used for baking.
I have used it for sponges and a substitute in buttercream.

Pros:

  • Dairy free
  • No hydrogenated vegetables fats
  • Leaves your mixture white
  • Allows for vibrant colouring in sponges and buttercream
  • Flavourless
  • Takes on flavours that are more "crisp" than with butter or margerine
  • You use less of it in the recipe 

Cons:
  • It can be greasy
  • You need to amend your recipe
  • Very sloppy if too warm
  • Flavourings are essential

My experiences:

I needed an alternative to butter or margerine in a sponge in order to obtain a vibrant blue colour. Margerine or butter would have left my mixture with a green colour due to the yellow of the butter / margerine.

I also needed a white buttercream for filling and piping, again, margerine or butter would have left the yellow base colour.

In order to combat the change in recipe, I used the conversion chart on the Trex website (click here). This worked out well!

For sponges:

My sponge batter was lighter in consistency and, as you'd expect, colour. 

The need for flavouring is essential. You can purchase a butter flavouring, but I was going to use a caramel flavour anyway. The amount of flavouring you need is much less than a sponge with butter / margerine, so I advise checking the flavour regularly and only add small amounts of flavouring at a time. A clean, crisp flavour is achieved. 

For a basic Victoria Sponge recipe using Trex, see here. I amend the recipe for achieve the volume of batter that I need. Try it! It's very tasty.

When using colourings, I use a paste rather than a liquid, this left me with a most wonderful blue sponge when baked.

Take a look here

If I had used no egg yolks, I would have achieved something even more vibrant in colour

For buttercream:

You must ensure that the correct amount of Trex to icing is used, otherwise your buttercream will be a greasy mess (see link above for conversion).

I have a tried and tested recipe here.

Using Trex means using less, so I find that adding a little water at the end of my mix gives me the consistency I require for either filling or piping. This combats the greasyness and, quite honestly, you'd never guess it was Trex.

You must use a flavouring! I found the blandness quite off-putting for a buttercream mix. Even a delicate hint of flavour makes all the difference.

Conclusion:

This review is a comparison to butter or margerine and based on my personal experiences.

I have concluded that, with the adjustments which the Trex website suggests, using Trex in baking is no greater in difference of the experience to using butter or margerine.

With the exception of flavour and colour, which can be easily remedied, Trex is an awesome alternative.

I would recommend this product as a dairy free alternative and for lending itself to vibrant colourings and flavourings.

A note about this review:

This is the first ever single product review I have written. I would welcome your comments (below) but be mindful that I have a "be nice" policy. Your comments, even if negative, would need to be constructive.

Thank you for reading

Niki

Sunday 4 September 2016

My Top Ten Cakey Bakey Tips


Now that my 2016 cake diary is complete, I want to share with you my top 10 tips for cakes, decorations and equipment ...
  1. Before spending lots of cash on tools, check your local bargain shops first. You might just find that they last just as long as expensive ones.
  2. Check out Play Dough tools for your stash. Yes, you read correctly, kids stuff. You'd be surprised at what you can find!
  3. If you're covering a large area with fondant, try and use professional grade fondant (I use Renshaws), the quality is far superior and more cost effective than supermarket bought stuff. Less liable to crack and dry out to quickly.
  4. Dont use "ordinary" fondant for your decoràtions, it won't work. Purchase modelling fondant or add CMC / Tylo / Tylose powder to your ordinary fondant.
  5. When looking to make a special, large fondant cake topper, check eBay and consider buying one rather than making.
  6. When making decorations with modelling fondant, make them a few days before, allow to dry, then store in an airtight container and away from heat, humidity and direct light. They can last for months!
  7. Also, when you've finished your modelling and have "scraps" left, don't throw it out, make small decorations e.g. tiny flower, stars, hearts etc. Put them in storage, you never know when they might come in handy. (see #8)
  8. If you have a blemish on your fondant, use one of those tiny shapes or flowers. It can make an imperfect cake look perfect!
  9. Do not use liquid food colouring! Use pastes, if you can't get pastes, gels will work.
  10. Give yourself time! One day to bake, the next to decorate.
There are many more top tens out there, but I hope mine are OK to get you started!

I'm taking some time out from my busy schedule then will be sharpening my skills for a possible 2017 diary

Also available on Instructables
Click icon above

Thursday 1 September 2016

Penblwydd Hapus - Welsh cake


What kind of cake do you make a couple, whose birthdays are pretty close together and loves Wales - a lot?

Enter, the Welsh flag with additional decorations.

A delicious chocolate sponge, sandwiched together with scrumptious chocolate buttercream and a crumb coat to match.


Oh I love the smell of my house when making chocolate cake mmm :-)


I had to find the middle of the cake to divide it for the two colours of frosting. I measured it and used cocktail sticks as my guide.


It did the trick. Definatley a tip for next time.


I coloured the green half myself. I need to find out how to stop it from cracking. It was the same thickness as the white, the length of time to get the top and sides fixed was also the same, but, alas, there are a few blemishes on the green half.

The cake was a 10" square. I'd never made a square one before. The fondant was a bit of a nightmare, but it looks OK.

I decorated it in all things handcrafted ...
Y Ddraig Goch (The Red Dragon) I made from modelling fondant using a large Welsh dragon cookie cutter.

I also hand crafted the leaves, letters, stars, leeks and daffodils, click on the links to see how.

I had a tiny Welsh dragon food-grade silicone mould which I used to make two to decorate the back, either side of a daffodil that was totally different


I couldn't be a Crafty Welsh Grandma if I didn't make at least one Welsh themed cake!

All that's left for me to say is ...
Sean and Christine, happy birthdays and don't eat it all at once.


Crumb Coat and Chill


A good crumb coat on your cake will turn it from a great cake into a masterpiece, so crumb coating and chilling your cake, in my opinion, is essential!

What is a crumb coat?
A crumb coat is the base coat of icing on your cake.Usually this is two coats. This coating is sometimes referred to as a "dirty icing layer".
The first layer will lock in the crumbs to prevent them from 'contaminating' any further layers.

What do you need?

  1. First thing - Chill your cake!
  2. Once chilled, level your cake
  3. Ensure your icing is stiff and holds its shape
  4. Once you've levelled your cakes, spread a little onto your cake board (in the middle) and place your first layer onto the board. This will act as a glue.
  5. Drop a big dollop of icing onto your cake, always add more than you think you need.
  6. Spread it evenly and add your second layer.
  7. Repeat for each layer you will be using 
  8. When you have 'topped' all your layers, use your offset spatula to smooth off the sides.  This will fill any cracks and dents and will also show if the cake is nice and central.
  9. Start spreading a thin layer of buttercream on the outside of your cake. If you have any crumbs on the spatula, scrape these off into your additional bowl.
  10. Holding your spatula at 90* angle to your cake, scrape off any excess icing.
  11. If you find gaps, fill them in
  12. Once you are happy that this layer is smooth and straight ...
  13. Chill
  14. Place in the refrigerator until the layer of icing is touchable without sticking to your finger.
  15. Once this is well chilled, repeat the process.
  16. On the next layer, make every effort to ensure that this layer is without blemishes and smooth.
  17. Chill again preferably overnight
  18. This is now the foundation for your fondant

Simple Syrup


It's called "simple syrup" for a reason, you can't get any simpler than this.
Once your cake has cooled for a little while, brush the top of your cake with the syrup to prevent it drying out.
Especially useful if you are carving a cake, applying fondant and decorating.
It also helps to re-moisten if you've left the top of you cake go a little hard.

➻ For a simple syrup:
  • Equal parts of water and granulated sugar.
  1. Combine the sugar and water in a small pan
  2. Stirring all the time, smmer over a medium heat until sugar has dissolved. 
  3. Allow to cool.
  4. Decant into a clean container with a good, tight fitting lid.
  5. Store in refrigerator - will keep for several weeks.

➻ For a richer flavour:
  • Follow as above using brown sugar

➻ Infusions:
Add, to the hot mixture, any one of the following:
  • A vanilla pod
  • Lemon zest
  • Orange zest
  • Ginger
  1. When cooled, strain and decant

Related Posts Plugin for WordPress, Blogger...