Friday 30 March 2018

Giant Doughnut Birthday Cake


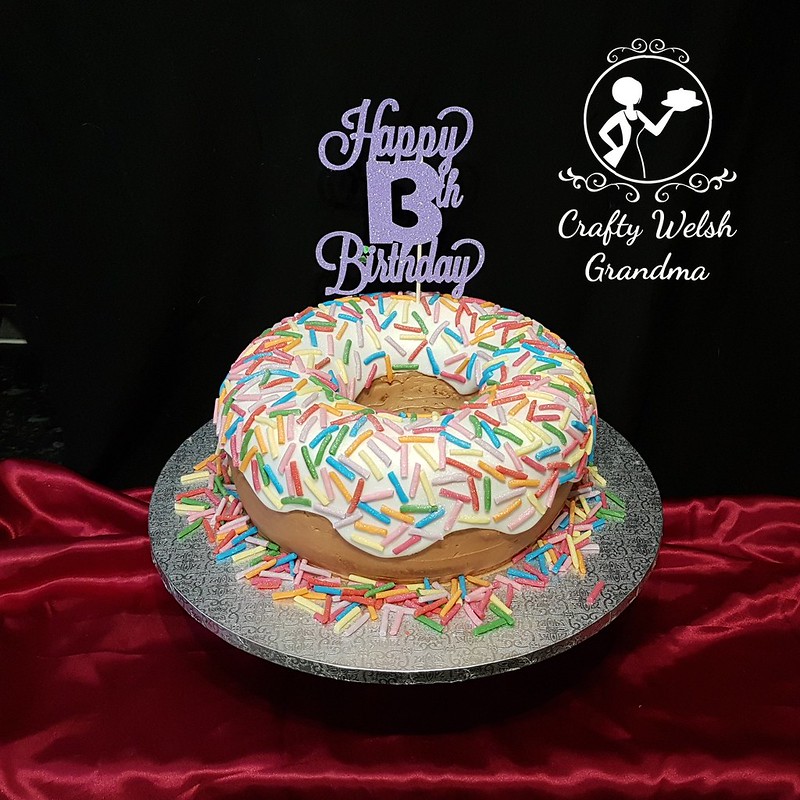
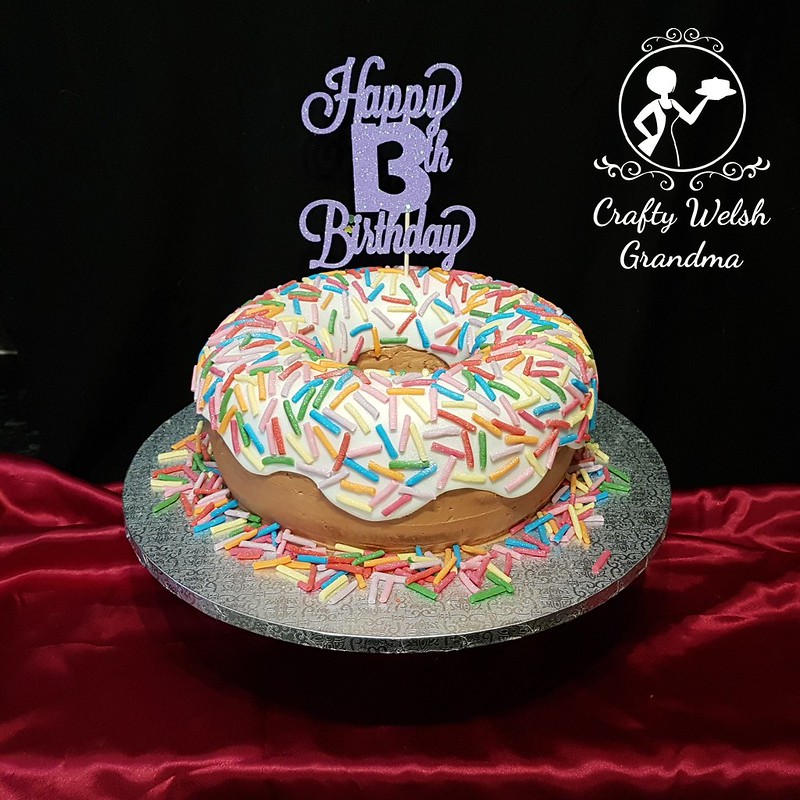
A ten inch doughnut cake for my Niece's birthday, commissioned by her mum.  Topped off with hand-cut hundreds and thousands / sugar strands - but from fondant.  

If you're planning a doughnut cake of your own, read on as I will show you how I cut the fondant for the 'icing' on the top.

I'm not a big fan of silicone baking mould / tins, but this is what I used here. This cake was a one-off and I didn't want to buy a ring cake tin for one cake. You can, of course, bake this in a standard tin, shape it yourself and cut a hole with a large round cookie cutter.

For this 10" cake, I used two mixes of my vanilla cake mix, one mix for each half. After trimming off the humps, I sandwiched it together with plain, vanilla buttercream coloured with Sugarflair chocolate food colour gel, I didn't use any other flavour except vanilla, my Niece's favourite. I used double the recipe of the buttercream also.

Once crumb coated and chilled, I added a final, thin layer, of the same buttercream and chilled it again.

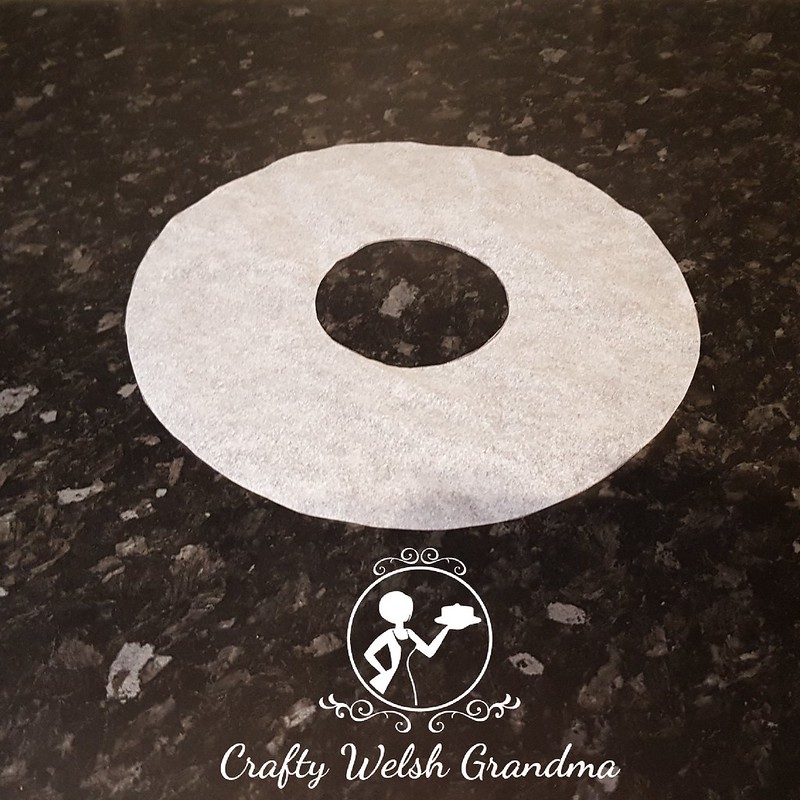
Now for the fake 'icing' that every ring doughnut shouldn't be seen without. 

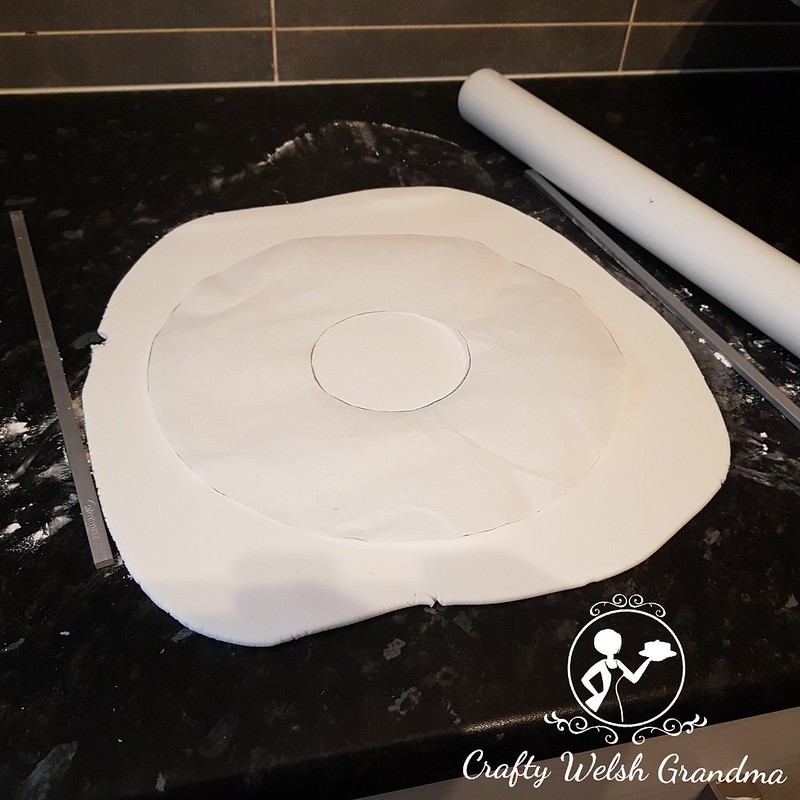
Using the tin you cooked the sponge in, draw around it.  If you've used a ring tin, draw around the centre hole whilst still in place.


If you've used a standard round tin and a cookie cutter, draw around the cookie cutter, making sure it's in the centre of  your outer circle.

Then cut it out


Once cut out, roll out your fondant so that your template fits. Place template on top and cut a wavy shape around, and on the inside of your template.


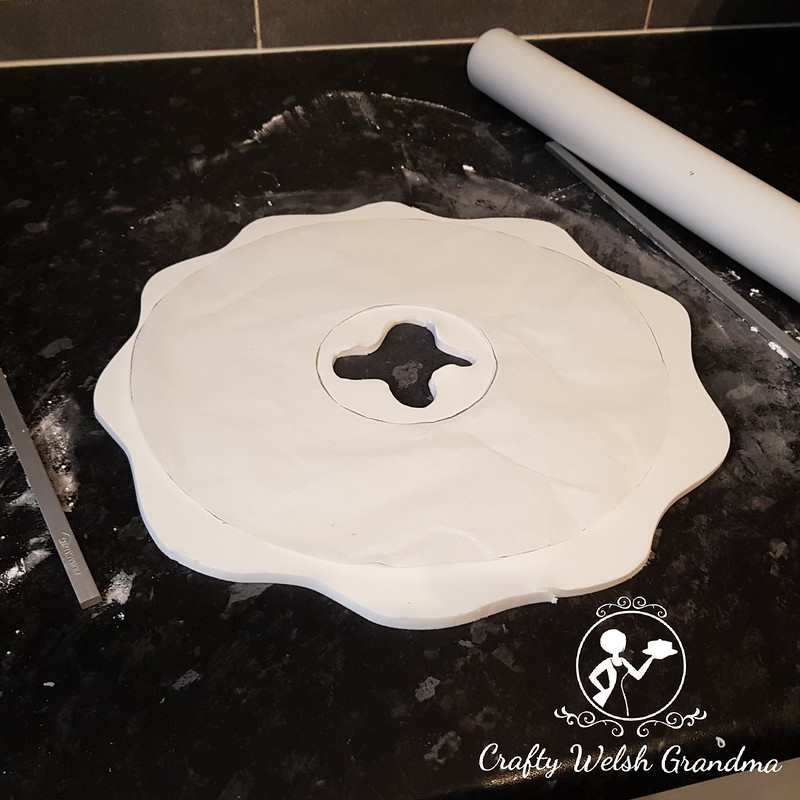
Use your fingers to smooth off the sharp, cut edges around the piece before placing on top of the cake. 

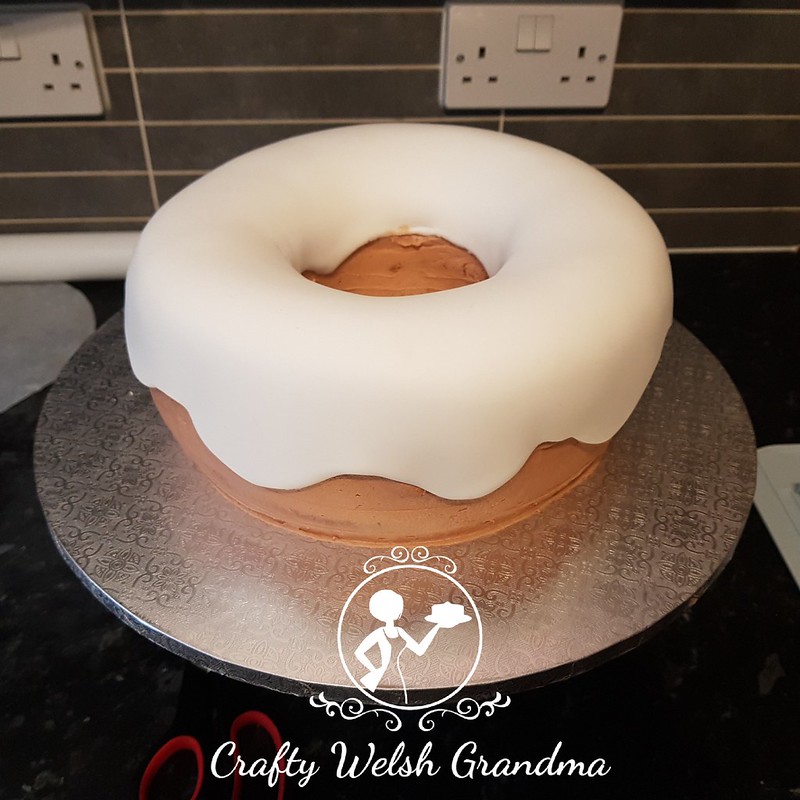
Then, place on the top of your cake. Gently smooth the icing down into the middle of the hole and down the outside.


Now for the sugar strands. It's hard to find large sugar strands so I made my own from fondant.

  1. Using a clay extruder, extrude the colours you require. If you don't have a clay extruder, you can roll your fondant into a thin sausage shape.
  2. Straighten them out.
  3. Allow to dry for a few moments, perhaps whilst you extrude the next colour
  4. Once dried a little, I used my smallest off-set spatula as a width guide and cut them with a sharp knife
  5. Allow to dry some more before adding to the cake.
This was, by far, the hardest part for me as I ended up cutting oodles of these fake sugar strands!


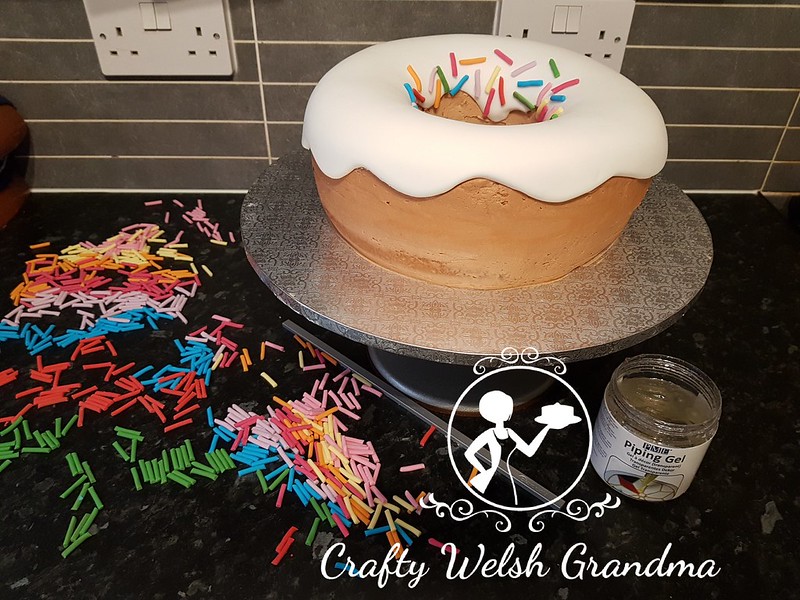
Affix, to the icing portion of your cake only, using either a little water, edible glue or, like I have, some clear piping gel.

I tried to be as random as possible, but I ended up seeing patterns forming, so I stopped for a coffee before completing.
I sprayed the cake with some clear glaze to simulate the shiny icing bit on the top and sprinkled with some magic ... silver, edible lustre dust.


My niece's other cakes have included:
Now, all that;s left for me to say is ...
Happy 13th Birthday to my fab Niece


Monday 26 March 2018

Carrot Cupcakes


Carrot is the flavour of this month and what better way to bring it to an end than a dozen scrummy cupcakes for a birthday gift.  

For my delicious, easy carrot cake mix, see here.

I made half with a basic buttercream frosting with a little orange stripe. Before adding the buttercream to the piping bag, A ran a thin line of orange food colour down the one side of the bag, then filled it with the buttercream and piped, using a star nozzle ...


and the other half with a cream cheese frosting. For these, I used a round nozzle, I'd never used one before and definitely need a bit more practice with it.


Once topped they were decorated with milk chocolate carrots I managed to source, these were wrapped to look like carrots and I thought they were a change from fondant ones.

Even though these are for my brother-in-law's birthday, they would also make a sweet addition to any Easter tea table.

Here is a full list of all the carrot cake projects I have published so far:

Friday 23 March 2018

18-Year-Old's Plethora of Chocolate


These types of cakes are becoming very popular for this here Crafty Welsh Grandma, this is the third one I've made in the last six or seven months.  

This one is for my Nephew, commissioned for him by his parents. He was 18 last weekend but is not having his celebration with his family until this weekend.

His Mam always insists on purchasing the resources required for the cakes that she asks me for, but this time, she has vastly over bought stuff! I think maybe I'll suggest that she leaves the purchasing to me from now on. She has a lot of waste - but the cake looks amazing! The cake stand in this image was not used on the day.

As I stated earlier, this kind of cake is becoming very common, check out my previous ones here:
This one consisted of:
It was decorated with:
  • Chocolate buttercream to stick all this chocolatey-ness onto.
  • Piped chocolate buttercream around the bottom of the cake, topped with alternate white and milk chocolate buttons
  • Hidden on the inside:
    • Chocolate M&Ms with
    • Crispy M&Ms
  • On the sides:
    • Milk chocolate finger biscuits
    • White chocolate finger biscuits 
  • On the top:
    • Maltesers
    • Minstrals
    • Milk chocolate buttons
    • White chocolate buttons 
Then trimmed off with a white grosgrain with a blue 'Happy Birthday' on it, which matches the wonderful blue glitter topper!

Oh, I almost forgot ... Some birthday magic in the shape of gold lustre dust!  Otherwise known as 'Unicorn F*rts!'

My nephew's other cakes have included:

I'm guessing all that's left for me to say is ...
Happy 18th Birthday to my little nephew xxx

Tuesday 20 March 2018

DIY Minecraft Names and Numbers


I'm not a Minecraft fan, but, by the time I get to finish this cake, I will be totally Minecafted out!   

So when the Grandson will be reaching the realm of a double figured age, this Grandma had better come up with the goods for what is his 'in thing' for this year!

His previous cakes have been:
For the Minecraft Sword, please see here for a detailed entry.

For the name and age, I had my daughter-in-law-to-be prepare some drawings on graph paper for me. If you don't know why the Minecraft stuff looks like this, see here

To ensure I obtained the pixelated / squared look, I needed the rolled modelling fondant to be impressed with tiny squares, which would also help me get it right.

I have a kitchen board that has small squares on the underside, I used this before when I made the PJ Masks Character Faces. It worked great then, so I'm using it again for this.


I rolled out the fondant, for the name, to 1mm thickness, impressed the squares and cut each one, following the graph paper design. The Creeper in the letter A was hard because I had to cut out the eyes and fill them in with black. But, as you can see, they came out half decent.

For the black background, I rolled the modelling paste out to 2mm thickness and, again, impressed with the squares.  I was then able to ensure that the letters were lined up. The letter A went a bit mis-shaped, but I don't think the big guy will mind on the day.

The letters, once stuck on the trimmed background were then dry brushed with white food colour gel to lighten them and give them a stone look. The four cocktail sticks will be used to affix this to the top of the cake.


The numbers were made using the same method, only this time, they were rolled to 5mm thickness. It was difficult for me to cut the inside of the 0 out. To get the cut-out look, I painted them using navy blue food colour and added a little dry brush of the same.

Once all these pieces were dried enough, they were sprayed with edible glaze and placed in my makeshift drying box.  After all, I don't need them until May, but this was only supposed to be a practice. However, they've worked so well, I'm going to keep them moisture-free and and in an airtight container until then.

My next project will be Minecraft Steve and a Creeper, watch this space

Sunday 18 March 2018

Minecraft Sword Cake Topper - Edible


This is my first attempt at this, and I made an error - fixed it too - and will show you all the good bits and the not so good bits so you can make your own.

I used:
* You don't have to use these if you can cut square using any other method.

Here's the how to bit:

To get the colours I used, I mixed:
  • Two parts white to one part blue - for the pale blue
  • Two parts blue to one part white - for the darker blue
  • I used the chocolate colour paste to colour the white fondant until I got the colour I required
I started by rolling out the paste, using the thinnest guide on my rolling pin. 

I quickly realised that, while the sizes on the geometric cutters are perfect for the cake decoration, they were far too big for the fondant sword.  To make the size I needed, about 8mm square, I :

  1. Cut them using the biggest square
  2. Cut that square into quarters using the smallest cutter
  3. Cut this square into quarters, still using the smallest cutter
Which left me with the size I needed. Allow to dry for a few minutes.

Cut sufficient squares (below is what I used for one side):
  • Black - Cut 58
  • Pale Blue - Cut 20
  • Dark Blue - Cut 16
  • Brown - Cut 4

I lay each, individual square according to the 'plan' that I had been given and did a 'dummy run' with all the tiny squares. From pommel to tip, the whole sword is less than 10 inches long, which is perfect because that will be the size of the cake when I bake it.


Now that I have the length and the width of the guard, I rolled out the black fondant paste using the thicker guide on the rolling pin to accommodate the size I had.

Next I glued them on, using clear piping gel, in the order that I had placed them during my dummy run.

Once glued down, I cut out the outline shape, using a craft knife. Using a fine paint brush, I placed some piping gel in between each of the squares and then all over the sword, then allowed to dry overnight.


Once completely dry, turn over and repeat the process on the other side. This is optional. 

Once again, allow to dry completely before adding to the cake


Saturday 17 March 2018

Classic Victoria Sponge


"The classic Victoria Sponge, also known as the Victoria Sandwich or Victorian Cake, was named after Queen Victoria, who was known to enjoy a slice of the sponge cake for afternoon tea. The sponge part evolved from the classic pound cake - equal quantities of butter, sugar, eggs and flour."

I bake cakes for loads of friends and family members, but it's rare that I bake a cake "just because." The last "just because" cake I baked for the home was the one to celebrate my 100th edible blog entry


The full recipe and instructions for this classic, timeless and simple sponge cake, is available for you here. As well as the basic buttercream recipe and instructions. 

You can change it to a chocolate sponge by simply replacing some of the flour with a good quality cocoa and also flavour the sponge with any essence you desire. Here is the recipe and instructions for chocolate buttercream, but you can also add your own choice of essences to suit your needs

This particular cake is an 8" cake, I use 50% extra of the recipe and baked over two tins. It has a simple buttercream filling with raspberry jam.

I did think about piping the filling in, so it would look nice and smart. But, you know what? Sometimes you just have to go with the classic look for the classic sponge! I just spread it on.

I hope you enjoy baking your own classic sponge and, if you've used my recipe, let me know how it went for you.  It's so simple, it's a task both you and the kids could enjoy!

Thursday 15 March 2018

All Manner of Birthday Cupcakes


These wonderful cupcakes were a last minute bake. I don't usually do last minute bakes, but this was an exceptional circumstance.  

Do you remember the Teenage Makeup Birthday Cake last month? Well, the young lady's party date had finally arrived. So, what better gift to give than sixty cupcakes?

I had intended to write a blog entry for each batch / dozen, but thought "I'm going to be here all night!" With that in mind, I'm putting all varieties in this one blog entry.

The first two batches I made were the chocolate ones, one set was topped off with chocolate flavoured fondant flowers and chocolate curls, the second batch was sprinkled with some 100s and 1000s.

The cupcakes were made using this recipe, you only need 75% of the mixture for 12 and then top them off, generously, with a double batch of chocolate buttercream.


The next batch I made was a scrumptious white chocolate batch. Both the mix and the buttercream was flavoured with white chocolate essence. Again, I used 75% of the cake mix and a double batch of buttercream (I also did this for the next two batches).

Sprinkled on top of these cupcakes were little white chocolate stars and white chocolate fondant cut into butterflies. These smell divine, so I should imagine they're going to taste just as good as they smell.


The last two batches I made were simple vanilla flavoured sponge and buttercream. Even though these are basic and simple cupcakes, it's the buttercream that makes them different.

The triple coloured pink ones were sprinkled with pink sugar sprinkles and the blue, double coloured ones were topped off with multicoloured candy stars.


If you find yourself needing to make a number of batches of cupcakes, it's simple to make then 'different'.

I use Mason Cash Disposable Piping Bags, I get them from The Range but you can get them on Amazon too. If you're going to use buttercream topping with two colours, then you will need three bags and, likewise, if you are going to use three colours, you'll need four bags.


Place your buttercream in the bags, without cutting the bottom off just yet, place your piping nozzle in the remaining bag as usual.

Once that is done, snip the ends off the full bags and gently ease the buttercream almost to the ends. lay them together then slide the full bags into the bag with the nozzle on the end.

Once that is done, pipe a little into a bowl until all the colours pipe in the stripey pattern. If you haven't tried it before, give it a go, it's fun and the results can be very interesting.


Friday 9 March 2018

Kawaii Carrot Cake


Yes, I know, this little dude has "bed hair", but that's because he has a long way to travel.  The less sticky-uppy bits he has, the less chance of damage in transit.

I adore kawaii things, let's face it, what's not to adore?  "What on earth is kawaii?" I hear some of you ask. Kawaii simply means cute! So, this little dude is ... A cute carrot cake! 

You will remember that my last cake was, in fact, another carrot cake! So what happened?  The Carrot Cake Plant Pot was destined for my eldest son's birthday last weekend. Nothing happened to the cake, it was quite fine, but we had this bit of a storm called 'Emma' combined with the 'Beast From the East' which made travelling to deliver this cake to my son in time for his birthday was virtually impossible (see Wikipedia about the cold wave).  By the time the storm dissipated, his birthday was over!


So, let's not worry about that now! Let's concentrate on the new cake, the new belated birthday cute cake even.

As you can see, it's not a plant pot this time. My son saw a picture of the plant pot cake and now I had to top that, as well as keep it secret because this time, he knows I'm visiting, but knows nothing about the cake this time - I hope!

The cake is made exactly the same as the Carrot Cake Plat Pot, but this time, the trimming left a bigger base than the plant pot did and it includes an internal cake card with bubble tea straws for stability!


The cool thing about cakes with eyes is ... they stare at you out of the box and it's so funny to see! The same this also happened when I made the Easter Chick last year

Saturday 3 March 2018

Carrot Cake Plant Pot


My kids seem to love my carrot cake, and one of them always loves his birthday cake made from carrot cake.  His cake for last year was a 24 Carrot Gold Cake which he loved. I had to top last years, somehow!

For this cake, I decided, keeping with the theme of carrots again this year, to do a plant pot with carrots growing in it.

I baked 3 6" carrot cakes, doubling up on the mixture here, I divided it equally between the three tins to ensure that all cakes were the same size.

Once they were topped off and divided into two layers, I trimmed them down, whilst upside down, from 4" down to the 6" edge at the bottom.  I kept the 6th layer for the very top.


I coloured my fondant with a terracotta colour for the plant pot.  What I should have done here it place a cake card in the middle of the layers and used some bobble tea straws to stabilise it, you will see later that it started 'listing' to one side due to the weight! Don't make the same mistake as me!


Once it was covered in the fondant and allowed to dry out a little, I flipped it over so it was the right way up.  Prior to doing this, I covered the cake board with green fondant to simulate grass.

Once the cake was in this state, I used the same buttercream, as I had used between the layers, for the top, then placed the last layer on and crumb coated that, carefully. I made a mistake and got some over the sides of the pot at the top, so I wiped it off with clean cloth.


Once it was ready to be covered, I rolled out a thicker length of fondant. Enough to go all the way around and about 1cm taller than the cake top. About 5mm of it was stuck to the side of the pot with piping gel.

The carrots were made from orange fondant. I rolled it into carrot shapes and cut the bottom flat, they didn't have to be straight, just flat.  I made some marks down the length of the carrot, inserted a cocktail stick and pushed it into the cake and buttercream. I made five of these. Far less than I made for last years cake. The green leaves were made using a large daisy cutter and rolled around, pinched on the bottom and inserted into a hole I had made in the top of the carrots.

I used Bourbon Biscuits for the 'dirt' in the pot.
I split them in half to remove the cream inside, once the cream was removed, I placed the biscuits in a bag and gave them a good bashing!

This was then spooned onto the top of the cake

As this cake was garden related and for my son, I was stuck as to what colour to use for the decorations!

Eventually, I opted for a green ivy decoration. I needed it to be as 'organic' as possible.  The 'Happy Birthday' was placed to look like it was hanging from a vine. 


The ivy leaves were given a little brush with some silver edible paint, for highlights and then some extra 'dirt' placed around the bottom of the pot and a few blades of fondant grass.

Having done all of this, and with my son's birthday on the 3rd of March, I just hope I can make the few hundred mile journey.  Not only is it rather unstable, being smaller on the bottom, but we have a severe weather warning and quite simply, can't get out of the street, let alone make the journey to have the day with my son for his birthday!

I just hope I can get there, if not, have a hap[y birthday anyway son xxx

This cake was inspired by a plant pot project that my caking hero, Yolanda Gampp, created, see here
Related Posts Plugin for WordPress, Blogger...