Sunday 23 September 2018

Power Rangers Birthday Cake


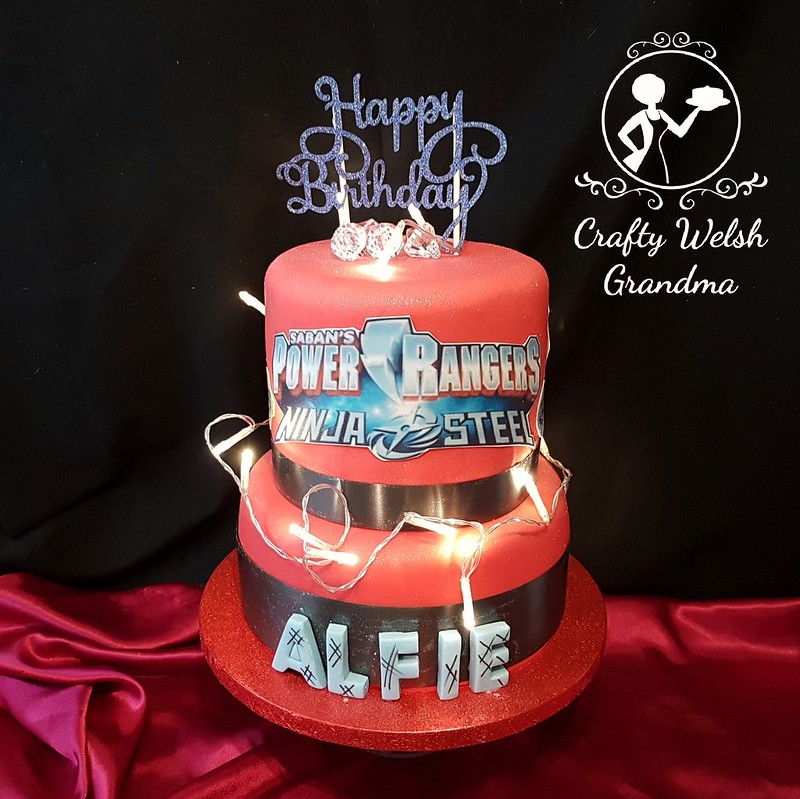
This two-tier Mighty Morphin Power Ranger cake has been made for a fab five-year-old.  It morphed out of my classic vanilla cake mix, vanilla simple syrup, smashing vanilla buttercream into an amazing sponge then covered in Power Ranger red fondant.


I would usually have made toppers for a cake such as this, but, alas, it was short notice and it does take some time for toppers to dry out completely. 

The edible, printed icing sheet was ordered from one of my regular suppliers on eBay. All I had to do for these was cut them out and affix to cake.

I think they've worked rather brilliantly. I've added lights to this cake which will not be delivered as part of the birthday boy's packages, but I just fancied using lights for this picture. 

I just hope he loves it, you know what five-year-old critics are like hehehe.

Small Unicorn Cake


This is the second Unicorn Cake I have made this month! Although we are all aware that cakes of these mystical creatures are a 'thing', some may feel that they are a little difficult to create. I want to show you that, even if you do not feel confident enough to create a Unicorn cake, there is no need to be.

My previous Unicorn Cake, seen here, was a fondant-free buttercream bonanza with a golden 3D horn topper. This one is utterly simple and it's the topper that makes this special.

 Click here for the supplier website

The Unicorn Cake Decorating Mould from Katy Sue Designs is the perfect choice for creating a wonder out of simplicity. It is a sturdy mould and exceptionally good quality. The brilliant plus-point of the Katy Sue Designs website is, they have video tutorials for pretty much every mould that they manufacture and sell! I urge you to check it out!

It was made using Renshaw's white modeling paste, removed from the mould, then allowed to dry overnight before 'painting'.  To paint this I used edible white pearl paint and edible petal dust for the mane, the flowers and leaves, then edible gold for the horn and some highlights. Once done, it was sprinkled over with edible lustre dust.


This is a simple, vanilla sponge using three six-inch cake tins and a three egg mix for each tin. It was topped in simple vanilla syrup, then sandwiched together, crumbcoated and final coated using vanilla buttercream

Once suitably chilled, the cake was covered in marbled fondant using 3 x 250g packs of Renshaws ready to roll icing, two in Baby Pink and one in Fushia Pink pack.

The excess fondant was mixed together to make one colour and used for the rope at the bottom, where the cake met the coloured eight-inch board.


I picked out and added only a few tiny hearts and stars out of the cake sprinkles I had, painted the rope at the bottom with the edible pearl paint.

And, well, that's it really. A superb and very simple, elegant Unicorn Cake!

Thursday 6 September 2018

Unicorn Cake


This is my first ever try at a Unicorn cake. I'm happy with it but can see where I could improve.

It consists an 8" and topped with a 6" vanilla cake sandwiched together with vanilla buttercream and a covering to match.

In each layer is hidden a sprinkling of Dr Oetker Glamour and Sparkle Mix


The bottom layer was totally covered in Dr Ortker Unicorn Confetti


I had some left over which I will use to sprinkle over the top of the bottom layer and some around the sides of the top. But not before I get the top onto the bottom. Which I did struggle with because this is a fondant-free cake and the sides, no matter how much chilling or freezing you do, it will still be sticky. Doesn't help that I still have humidity issues here.

Here, in the UK, A/C is not standard, so I have the extractor fan on constant and dehumidifiers everywhere. But I did it, with a little help.


Not forgetting the bubble tea straws to hold up the top layer.

The horn and ears were made a few days before, I didn't manage to take pictures of this process, but I imagine there are plenty of YouTube videos out there on how to make them.  The best way to make the ears was with large and small heart-shaped cutters, they worked brilliantly

Once the ears and horn was in place, I used three different colours of buttercream to cover the top and sides, down to the base, leaving the front free for some closed eyes,


I hope the little six-year-old will be happy with it, I think she will be.

I know I haven't posted a blog for a while, I took the summer off to 'recover' after the wedding cake, the charity cupcake day and another cake. All these crammed in together, or so it felt. I'm also going to be taking it easy until Chrismas, but I shall still find things to bake and blog about I'm sure lol
Related Posts Plugin for WordPress, Blogger...