Thursday 22 June 2017

Sugar Skulls Birthday Cake


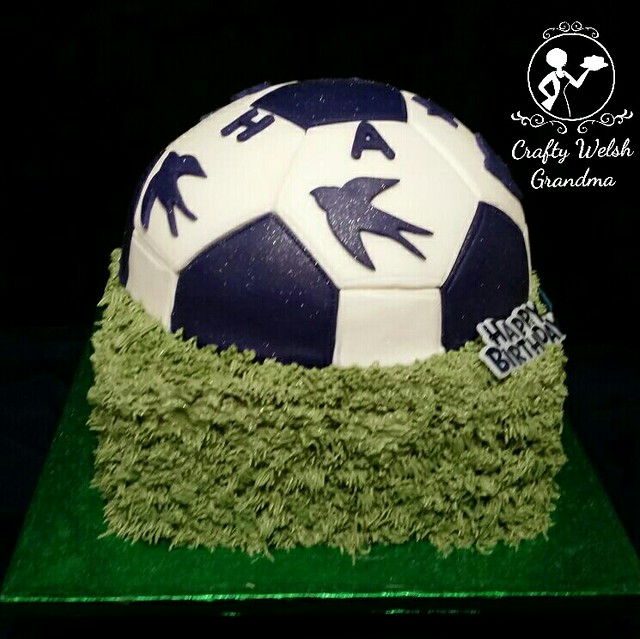
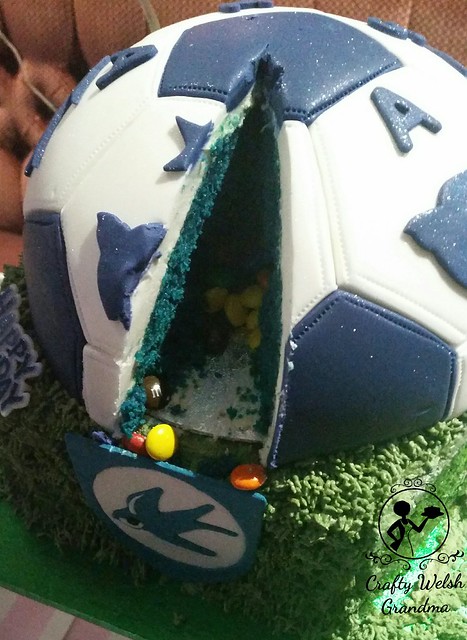
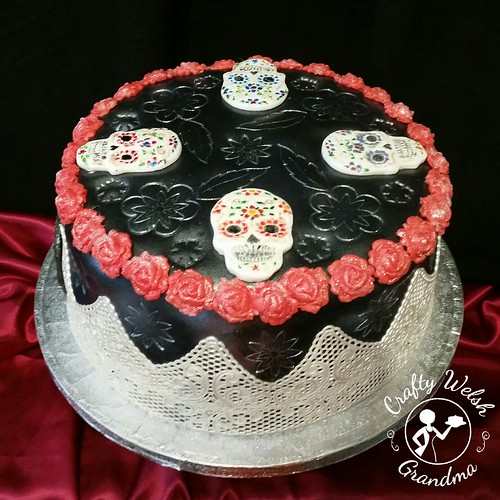
What on earth sort of cake do you make a girl who's not 'pink and fluffy' and doesn't like a big fuss? Well, here it is! It wasn't my first idea, but the resources I needed for my original idea are not due to arrive until after the cake has been made, but I love the simplicity of this dark, yet colourful one!

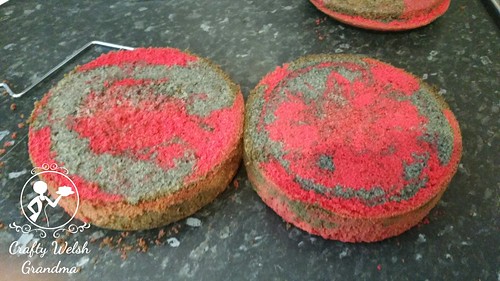
Sponge prior to all caramelised layers being removed

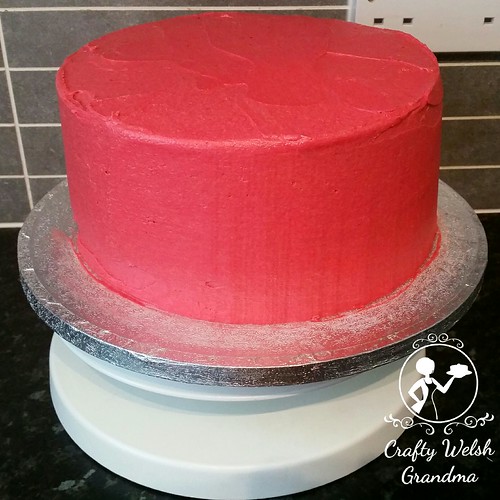
The sponge is coloured in a random dark grey and cherry red, which I hope cuts well, but it tastes divine, a simple vanilla flavoured sponge, covered in luscious vanilla flavoured, cherry red, buttercream


As you may have noticed over my last few blog entries, I've been having some serious issues with a new refrigerator. It seems as though I purchased a new one with a faulty thermostat, which is being fixed later today (22nd June).  With this in mind, I've had to rely on a friend and neighbour for a loan of some space in their refrigerator.

I'm not sure if the black fondant used had a problem or the fact that the 'ambient' temperature in my kitchen - 28.5°C - affected it so dramatically! It slipped and was so sticky that it became almost impossible to work with.  


I'd already pre-made the sugar skulls and painted them by hand using food colour gels.

The lace I purchased, because I'd been advised that our local weather could cause some issues, so buying pre-made edible lace was the way to go for this cake.

The red glitter roses were made on the day of decoration and added to the cake immediately, as and when required.

Into the super soft problematic black fondant, I embossed some simple flowers, but not before dipping the 'stamps' into edible glitter first.

Silver lustre dust was used to add some sparkly magic to the finished cake and my work here was done!

All that's left for me to say is
Happy Birthday Evie
  

Thursday 15 June 2017

Jaffa Cake Cupcakes


Otherwise known as Chocolate Orange cupcakes.  I wasn't sure how these would go down with the guests, so I didn't make many - big mistake!

I used the chocolate mix from my recipe book and did not add any orange extract to this portion of the cupcake.

For the buttercream, however, I used the chocolate recipe and added some orange extract.


Before I added the buttercream, I scooped out about a tea spoon's worth of sponge from the centre of the cupcake.  To this 'hole' in added orange jelly aka jello (suitable for vegetarians). Then, rather carefully, I started adding the buttercream until the hole was covered then carried on until I finished the cupcake.

What ever else could I top this off with other than gold lustre dust! Perfection on a plate!

Lemon Cupcakes


How to kick up a storm in my house, make lemon cupcakes!

By now, you've guessed that the good old amazing recipe for this mix is pretty much always used! You can also search the internet and use the recipe for lemon drizzle cake as a base if you prefer. To my mix, I did not add lemon extract, instead I purchased something called Ready Zest,and boy did it pay off!


It's nothing more than the zest of one whole lemon and smells scrumptious to the point where your mouth waters madly, well, mine did anyway.

To the buttercream I added lemon extract instead of the vanilla and some yellow food colour gel.


To top these off and not to distract the taster from the yummy lemon-ness, I sprinkled the top with some yellow sugar decorations.

Mint-Choc-Chip Cupcakes


You'll find I use my old faithful cake mix for the base of pretty much everything, and these were no exception! To this mix, I added some American Peppermint Extract to taste plus a handful of dark chocolate chips, about 250g

For the topping, once again, I used my basic buttercream but exchanged the vanilla extract for the same American Peppermint Extract and a mint coloured green gel.

To top them off, I added some grated chocolate and two mint Matchmaker Minis

Turkish Delight Cupcakes


These went down a total storm last year, so I made a few more than usual, and I ran out in no time - again!

Using the faithful sponge mix, I added a handful of milk chocolate chips to the batter, I'd say it was about 250g, then added about 7.5ml of rose water. I don't mess about with flavourings, I use good quality extracts.

I also used a quality food colour gel to get the right colour pink. Now I can't tell you how much to use per batter mix, but starting with about 5g is a good place then add more if you need to.  Colours are all by eye and it depends on how pale  you can beat your batter 

Once more, good old faithful buttercream mix was used, but exchange the vanilla for the rose water for flavour and add some pink gel food colour until you reach the colour you prefer.

I made a tiny red bow from fondant to top this one off.

I would eat Turkish Delight all day long if I could, just the smell of it makes my mouth water.

Carrot Cupcakes


Yes, that's quite right, carrot cupcakes. I also wanted to make beetroot ones, but simply ran out of time!  

I used the same recipe as the 24 Carrot Gold cake I made back in March and will shortly be adding this recipe also to my recipe book here.

I made cute little half carrots from fondant and added them to the top as a decoration 

Red Velvet Cupcakes


I don't make red velvet sponge often, in fact, the last time I made it was Cupcake Day in 2016.  As far as I can tell, there's no getting away from it, you need the buttermilk (available at all good supermarkets).  There are plenty of recipes about the internet, you need to find the best one for you.  

However, I did not use the expected topping mix for these, I used a standard vanilla buttercream topping, beat it into submission and it turned a lighter shade of pale (",)

Banana Cupcakes


I wanted such a variety of cupcakes this year and it started with banana ones. I did want to decorate these like Minions, but standing for hours on end decorating the countless cupcakes meant that my feet were killing me!

So, alas, and straight topped cupcake with a "B" on the top was all I could manage. Which worked great for the kids that visited, the little ones whose name began with a "B" wanted them because "it has my name on it."

I'll be putting my recipe for the banana bread mix in used in my recipe book soon

Alzheimer's Society Cupcake Day


This year's prize, for the guess the weight of the cake competition, was not a giant cupcake, like last years.  This year, I made a standard cake and decorated it in forget-me-nots and added my own handmade copy of their logo.

The sponge was my classic sponge mix, with my own classic buttercream filling, then covered in white fondant and decorated in absolutely loads of little blue flowers - forget-me-nots.

I raised way beyond my target, most of which was on the day and offline. To view the total, click here.
Thank you, from the bottom of my heart, to everyone who participated and donated.

Friday 9 June 2017

Unicorn Poo - Cupcake


Would you believe me if I told you?
I was just making simple cupcakes, minding my own business and before I knew it ... this unicorn sneaked into my kitchen and did this on my cupcakes. Lol 

Russian Tip Roses - Cupcake


This was my first effort using my new Russian Piing Tips, I see I need more practice

Swansea City FC - Cupcake


This post is just to showcase a cupcake I've made.

Football Cake - Blue


I love it when I'm asked to make a football cake - for a girl! And this young lady has no idea that she's even having a party, let alone a cake :-)  

She's a bit on a Cardiff City fan, but a small cake, like the Bluebirds one, would simply not do. I seem to be making quite a few football cakes, there's ...
  1. The Liverpool one
  2. The Bluebirds one
  3. The Red one 
  4. And now this one
Once again, this was two separate cakes, only brought together for the final decoration. Using my faithful sponge mix, with Trex for the top and Stork for the bottom, I cooked two layers for the grass and one large dome for the top. Inside the dome top is a yummy surprise for the recipient.

Due to some technical issues, again with the fridge, even though I had soaked the sponges in the simple syrup, the top seemed to have turn out quite hard. I hope it softens up by the time of the party.


The top sponge was placed on it's own cake card, then crumb coated, chilled and covered in white fondant ...


Each white and blue piece was individually cut, using a template I had made myself, then fixed to the cake, using a little water as glue ...


... And trimmed down to fit.


The next step was to add some stitching. Using a quilting tool, I ran a simple line at the edge of each section of the ball.  

Once this was completed, nine stabilising dowels (bubble straws) were used in the bottom layer to prevent the tops shifting and squashing the bottom layer.  The top is rather heavy.


The sponge for the top is coloured in blue, to match the theme for the cake - blue and white, not the standard black and white football.


Below the recipient's name on the cake is a bluebird and a CCFC logo (made previously) has been added to the one side. This portion of the cake has been pipped in the same colour green as the sponge is made with.

Surprise inside the cake ... Chocolate M&Ms

Thursday 8 June 2017

Wedding Cake - June 2017


This cake has been months in the making, yet nothing had started to be made until three days before the actual wedding day!  The bride-to-be wanted a sponge cake and on an extremely tight budget.  The cake topper, however, was made a few weeks in advance.

I only have a small oven, and it's not fan-assisted, so it took me about nine hours to bake, including stopping for lunch.  Each of the six mixes that would make up the three tiers had to be cooked one at a time.


I measured the mixes by the quantity of eggs and were as follows:
  • Tier #1 - A 6" sandwiched sponge required six eggs
  • Tier #2 - An 8" sandwiched sponge required 12 eggs
  • Tier #3 - A 10" sandwiched sponge required 16 eggs
Three stacked tiers, for measure

Each sponge was delicately flavoured with vanilla and sandwiched together and crumbcoated using a complimenting buttercream.


Tier #1 (top) - 6" Cake
This tier has a quilted effect with silver balls in each part of the pattern where the lines cross.
To do this I needed mark the cake into equal sections and place markers. Next I had to ensure that the bottom marker is directly below the top marker. Marks were made from the bottom marker on a slant to the marker two points away.
Image from public domain

With a steady hand, a ruler for be sure, a quilting tool was used to simulate stitching. Using the other side of the quilting tool, small star bursts were added to simulate creased material ready for the 'buttons' aka silver balls - the silver balls were then added where the lines cross.

Tier #2 (middle) - 8" Cake
This layer is not quilted, to ensure the quilting does not overpower the cake, I successfully convinced the bride-to-be that a simple lace layer would look far better. Now that it's done, I quite agree with my decision.

Tier #3 (bottom) - 10" Cake
This layer was also quilted, in the same way as tier #1.

A significant amount of hours was spent on decorating this beauty. The day started at 11am and it ended at around 5.30pm - on my birthday too lol.

The cake has been decorated with a designated back and front, but no actual centre-front. The whole front is the front and designed to look it's best from all three, relatively front facing 'sides'.

Delivering the cake was a two-man job, or in this case, two women. But we managed it with such ease, I have no idea what all the worrying was all about.


All that's left for me to say is ...

Good luck to the Bride and Groom

Floral Cake Topper


I was tasked with a commission a little out of my comfort zone, making a cake topper to compliment / match a bride's bouquet for the wedding cake I have also been commissioned for.

Issues to overcome were:
  1. I can't make bouquets
  2. I had to match the artificial roses in her bouquet, exactly!
The best way for me to go was delegate the task to my faithful topper maker, whose crowning glory finished off the Naked Engagement Cake I made for a family member back in April.

Below is an image of the bridal bouquet ...


It's a simple, yet elegant bouquet. For the topper, it was not possible to use the blue 'glitter' pieces as it wasn't possible to find food safe ones where the glitter wouldn't fall onto the cake.

I sent my topper maker off to source and purchase, on a strict budget, the artificial roses that exactly match the bridal bouquet. Full credit and thanks to them for doing such a perfect job and sourcing the perfect match, if not exact same ones.

As the bouquet topper's assistant, I simply made suggestions and took pictures to check back on later, blow is an image of one of the suggestions / ideas that we had ...


I'd promised the bride-to-be some pearls, but the ones I wanted did not look the best when in the bouquet, so I chose small flower and pearl pieces. I think it looks quite nice!

The bride-to-be's cake is to be ivory (by request) with silver balls in the quilted design on the top and bottom tier, with that in mind, we added some diamante pins.  These would compliment both the cake and the bouquet.

The finished topper (image at top of this blog post) will crown the wedding cake that I am making for the June wedding.

I would like to take this chance to thank my faithful topper maker for another wonderful crowning glory. Without their help, what would I do to compliment my cakes? The toppers make the whole thing perfect.
Related Posts Plugin for WordPress, Blogger...