
So, last week I tried my first ever fondant daffodil, it worked out OK for a first try, but I didn't take step by step images. I don't have daffodil cutters, so I had to improvise because I didn't want to buy one just for one cake. I needed more flowers anyway, so here are the instructions...
Bits you need:

- Your rolling pin
- Tools
- Star cutters
- Modelling fondant
- Yellow and red (or orange) food colour (gels or pastes, I used both) or
- Yellow and red (or orange) modelling fondant
- Edible glue
- Icing sugar to stop fondant sticking to your board
I also used, not in the picture above,
- A cake tester skewer or cocktail stick
- A dome shaped "cup" eg egg cup. I used a cake pop tray
Step 1:
Colour your fondant yellow then pinch about 1/3 of it and add a tiny quantity of red to make orange.
Step 2:

Roll out the yellow, using the desired size star cutter, cut out stars. You need two per flower.
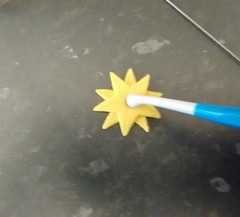
Step 3:
Using your cake tester or cocktail stick, make an indent from the point of the star to the centre. Do not cut or split the point.

My picture didn't show it very well, so I've added this image to help.
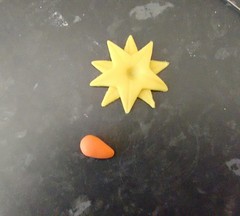
Step 4:
Next, put a dab of glue, or water, in the centre of the star that will be on the bottom. Then place the second star on top in such a way that you now have ten "petals".
Step 5:
Using your ball tool, press lightly in the centre. Don't push tool all the way through.
Step 6:
Roll a small amount of the orange fondant into a ball then pinch one end, so it looks like a cone.
Step 7:
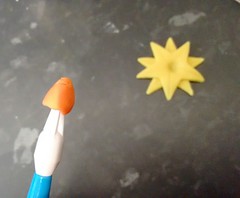
Press your star tool into the thicker end and roll it between your fingers to widen the hole you've made.
This will also give you a pattern inside like the trumpet of a daffodil.
Sorry about the red food colour still on my fingers ;-)
If you're finding the cones hard to make, see the update at the end of this post.
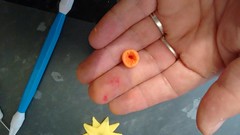
Step 8:
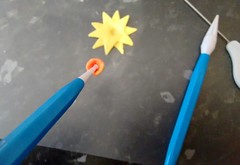
Then take your small ball tool, press gently into the middle of the trumpet.
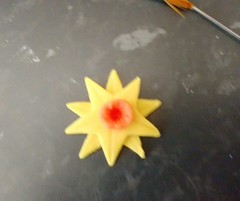
Step 9:
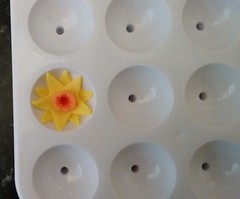
If you can, try to pick the flower up using the ball tool and place it into your egg cup shaped holder, if not, just slide it in carefully
The holder will allow the flower to dry with the leaves curled up, like the real thing.
I made a few, only one very small, it was too fiddley so that's all I did that size
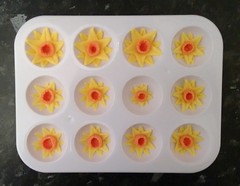
Step 10:
Allow to dry and stick to your cake / top off your cupcake
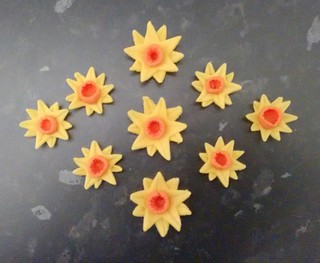

My picture didn't show it very well, so I've added this image to help.
Step 4:
Next, put a dab of glue, or water, in the centre of the star that will be on the bottom. Then place the second star on top in such a way that you now have ten "petals".
Step 5:
Step 6:
Roll a small amount of the orange fondant into a ball then pinch one end, so it looks like a cone.
Step 7:
Press your star tool into the thicker end and roll it between your fingers to widen the hole you've made.
This will also give you a pattern inside like the trumpet of a daffodil.
Sorry about the red food colour still on my fingers ;-)
If you're finding the cones hard to make, see the update at the end of this post.
Step 8:
Add a dab of glue or water to the centre of your petals
Then take your small ball tool, press gently into the middle of the trumpet.
Pick it up attached to the ball tool and press it into the centre of your stars / petals.
If you can't pick the "trumpet" up with the ball tool, use your fingers. Place it in the centre of your petals then push gently, in the centre, with your small ball tool
Step 9:
If you can, try to pick the flower up using the ball tool and place it into your egg cup shaped holder, if not, just slide it in carefully
The holder will allow the flower to dry with the leaves curled up, like the real thing.
I made a few, only one very small, it was too fiddley so that's all I did that size
Step 10:
Allow to dry and stick to your cake / top off your cupcake
Update:
If you're find those little centre cones just too fiddly, try these:
- You need small flower plunger cutters
- Cut them out
- Shape using a ball tool by curling the pettals upward
- Attach to your star shaped leaves in the same way as above.
I hope you found this post useful. Please feel free to leave comments or questions below or let me know how yours turned out.


Update: November 2017
It is unfortunate that this post and / or the post on my Instructables has been stolen, copied and passed off as someone else's on another website.
Whilst I appreciate and am flattered when readers share my work, all I ask if that you share the link. This way, I am credited accordingly without any bad feelings.
Also available on Instructables
Featured Post
Featured Post

Update: November 2017
It is unfortunate that this post and / or the post on my Instructables has been stolen, copied and passed off as someone else's on another website.
Whilst I appreciate and am flattered when readers share my work, all I ask if that you share the link. This way, I am credited accordingly without any bad feelings.

2B23C45173
ReplyDeletekiralık hacker
hacker arıyorum
kiralık hacker
hacker arıyorum
belek
181C911B6C6C
ReplyDeleteSosyal medya hesaplarınızın büyümesi için doğru adımlar atmanız önemlidir. Bu noktada güvenilir smm panel hizmetleri sayesinde organik ve hızlı bir şekilde takipçi sayınızı artırabilirsiniz. Kaliteli ve güvenilir bir panel ile çalışmalarınızı sorunsuz bir şekilde ilerletebilirsiniz. Unutmayın doğru panel seçimi başarınızın anahtarıdır.
ReplyDeleteWhen looking to enhance your clothing line, consider the benefits of dtf transfers for t-shirts. These transfers offer vibrant, durable designs that last wash after wash. Many entrepreneurs find them to be a cost-effective way to produce custom apparel. For quality and variety, explore dtf transfers for t-shirts today.